so my stupid thought went like this: so i am backing up my full proxmox server, host, vms and lxcs to an onsite proxmox-backup-server on an mini-pc, so i should probably do that with my laptop and desktop to keep things available if need be later – like when i decide to wipe my whole OS (see last post).
easier said than done as always. the PBE server-side stuff was really just the simple part
1) create a new datastore: for me using the GUI click the new datastore and give it a name, I used “not-server” and the path /datastore/not-server. click done and wait a few till it shows up
2) create a new user – if you are doing this with the “root” account for any other datastores, shame on you. i used my name, i know, original. then set a password. user should be authenticating in PB not PAM. this is all under Configuration > Access Control > User management.
3) setup permissions for user on datastore/not-server. click your data store and goto the permissions tab > add. here you find the user from the dropbox and change access from no access to DatastoreAdmin or DatastorePowerUser for backing up etc. i used DatastoreAdmin. thats pretty much it. now, you can use a token if you like, but im putting all this in a chmod 600 executable with env variables, including the password so to each there own.
for my install on garuda (fancy arch linux) i used pacman to pull the file:
sudo pacman -S proxmox-backup-client
then you set some environmental variables…these can be very different, so just showing you what i did and it may only work for me.
export PBS_USER=joe
export PBS_PASSWORD=********
export PBS_REPOSITORY=joe@pbs@192.168.50.3:8007:not-server
then after much experimenting – maybe this will help save you some time
sudo -E proxmox-backup-client backup root.pxar:/ --include-dev /home
now here’s what that all means: the export commands set the environmental variables for your current shell, the repository is the user@pbs@yourbackupIP:port:datastorename
sudo is required to access the filesystem of course, -E preserves these variables (otherwise sudo clean-slates that shit) – ask me how long it took to figure that shit out! “backup” just tells the command what the hell we are doing, root is the file system details – this could be root, etc, home etc. “pxar” ? dunno, probably in the man page somewhere, but i just want all things. “–include-dev home” means it wont skip my whole /home/joe dir
so with any luck it spits out this:
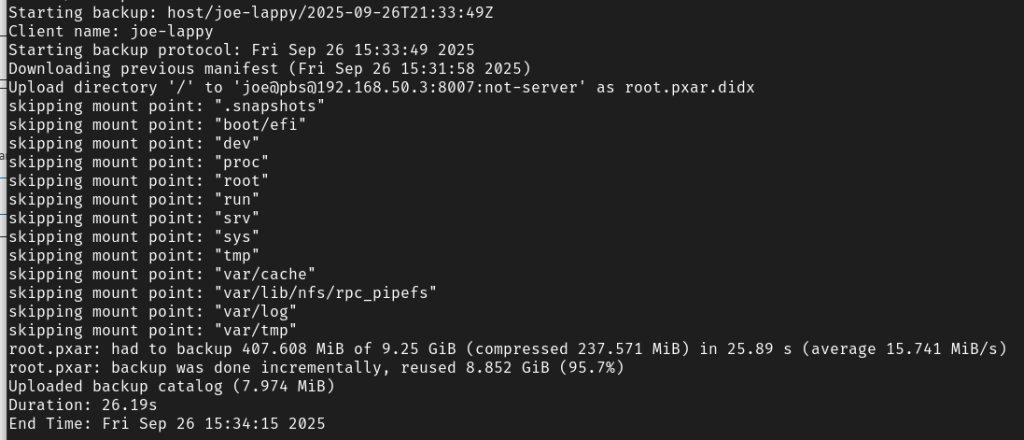
you can see we are skipping a buncha temp dirs, .snapshots etc. you could “include-dev” dev or proc or anything else if you feel like it, just add to the command.
now that its working here’s a few fun facts. environmental variables will not persist through a reboot. if you wanna schedule thats annoying as fuck, so i built a bash script to do that for me:
#!/bin/bash

##Setting environmental variables

export PBS_USER=joe
export PBS_PASSWORD=**********
export PBS_REPOSITORY=joe@pbs@192.168.50.3:8007:not-server

##Sudo command with -E to preserve the env variables
sudo -E proxmox-backup-client backup root.pxar:/ --include-dev /home
make it executable:
sudo chmod +x whateveryourscriptsname.shthis gets the job done everytime. now i also for funzies want to make it execute daily, like the rest of my vms and lxcs
sooooo……….arch doesn’t use crontab or cron or any variant. so now you gotta do some other shit. i followed this guide from duck duck go AI and it worked fine:
Systemd Timer Backup Setup

To set up a systemd service and timer to execute `~/backup.sh` once daily after the network is up, follow these steps:

1.  **Create the backup script:** Ensure the script `~/backup.sh` exists and is executable. The script should contain the commands you want to run for your backup.

2.  **Create the service unit file:** Create a file named `backup.service` in `~/.config/systemd/user/` (for a user service) or `/etc/systemd/system/` (for a system service). The file should contain the following content:
    ```ini
    [Unit]
    Description=Daily backup after network is up
    After=network-online.target
    Wants=network-online.target

    [Service]
    Type=oneshot
    ExecStart=/home/yourusername/backup.sh
    User=yourusername
    WorkingDirectory=/home/yourusername
    ```

3.  **Create the timer unit file:** Create a file named `backup.timer` in the same directory as the service file (`~/.config/systemd/user/` or `/etc/systemd/system/`). The file should contain the following content:
    ```ini
    [Unit]
    Description=Run daily backup after network is up
    Requires=backup.service
    After=network-online.target

    [Timer]
    OnCalendar=daily
    Persistent=true
    AccuracySec=1min

    [Install]
    WantedBy=timers.target
    ```

4.  **Reload systemd and enable the timer:**
    *   If using a user service, run: `systemctl --user daemon-reload` and `systemctl --user enable backup.timer`.
    *   If using a system service, run: `systemctl daemon-reload` and `systemctl enable backup.timer`.

5.  **Start the timer:** Run `systemctl --user start backup.timer` (for user service) or `systemctl start backup.timer` (for system service).

The timer will trigger the service daily at midnight (00:00:00) after the `network-online.target` is reached. The `Persistent=true` option ensures that if the system was down during the scheduled time, the backup will run the next time the system boots up and the network is available  The `After=network-online.target` and `Wants=network-online.target` directives in the service unit ensure the backup runs only after the network is fully up
hoorah.